ISA Intrusion
Table of Contents
- Overview
- Background
- Find the Flag
3.1. What Is This Challenge?
3.2. Dynamic Reverse Engineering - Conclusion
Overview
- 91 solves / 200 points
- Author: harrier
- Overall difficulty for me (From 1-10 stars): ★★☆☆☆☆☆☆☆☆
Background

There is a sus program written in Bauhinia ISA that seems to hide some flag 👀
Maybe you can use your reverse engineering skill as well in a unfamilar environment?
Note: There is a guide for this challenge here.
Web: http://bauhinia-isa-hwuj66.hkcert23.pwnable.hk:28900/?id=7
What is ISA: https://hackmd.io/@blackb6a/bauhinia-isa
Find the Flag
What Is This Challenge?
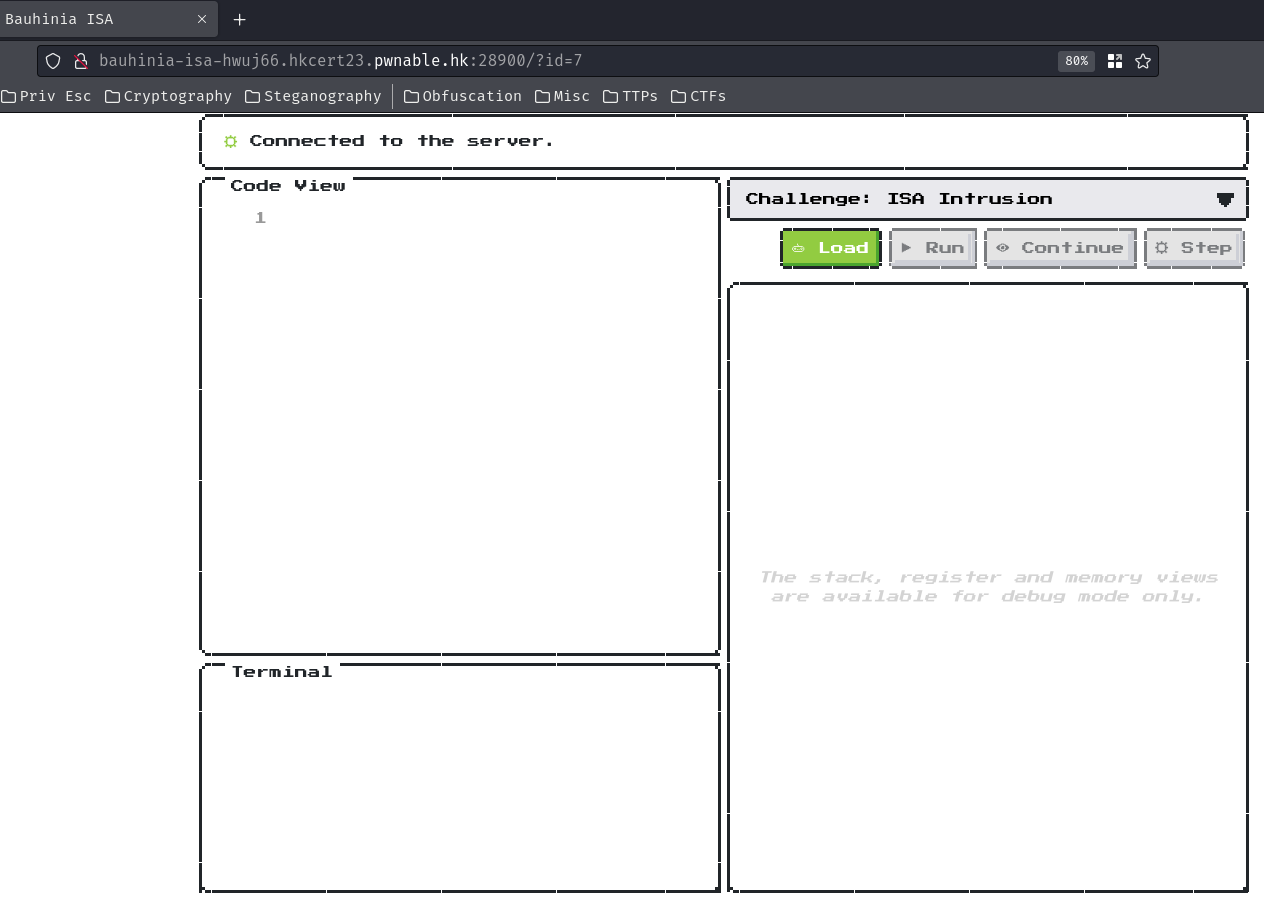
In this challenge, we can go to a web application:
We can click the "Load" button to load the custom assembly language that written by Black Bauhinia:

Then, we can click the "Run" button to run the assembly code:
In this challenge, we can also read the documentation of the Bauhinia ISA custom assembly language: https://hackmd.io/@blackb6a/hkcert-ctf-2023-i-en-a58d115f39feab46.
So, there're tons of stuff we need to digest in the documentation, and I'll try to summarize it:
Bauhinia ISA is a custom assembly language that's similar to Intel's x64 assembly
Instruction Operands:
An instruction of Bauhinia ISA has the following format:
mnemonic argument1, argument2
- Mnemonic: a reserved name for a class of instruction operators which have the same function. i.e.
JMP,NOP,PUSH - Operands:
argument1andargument2are optional. When present, they take the form of either literals or identifiers for data items.
When two operands are present in an arithmetic or logical instruction, the right operand is the source and the left operand is the destination.
For example: MOV R3, 1337 is an instruction. In this case, MOV is the mnemonic identifier of an operator, R3 is the destination operand and 1337 is the source operand.
Registers:
There are eight general-purpose registers, namely, R1, R2, R3, R4, R5, R6, R7 and R8.
There are three registers with specific roles:
PC, the program counterFP, the frame pointer (or the stack base pointer)SP, the stack pointer
Memory regions and addresses:
There are two memory segments defined by Bauhinia ISA, defined by the below table:
| Segment name | Segment address | Segment size |
|---|---|---|
| Code | 0x00400000 |
0x100000 |
| Stack | 0xfff00000 |
0x100000 |
Any access to memory apart from these regions will be considered invalid.
Initial values:
When the program executes, the registers and the memory will be initialized by the following values:
PCwill be set to the beginning of the code segment, i.e.,0x00400000,FPandSPwill be set to0xfffffff0, and- the code segment will be set to the defined program in string.
Limitations:
The interpreter will keep track on the number of steps executed. If there are more than MAX_STEP_COUNT steps, the interpreter will stop processing and will return an non-zero exit code, stating that the step count exceeded the limit. At the moment, MAX_STEP_COUNT is defined to be 131072.
Exit codes:
There're some important exit codes in this challenge:
- Exit code
0: OK- This exit code is called to indicate the program exits successfully.
- Exit code
65: Step count exceeded- This exit code will be triggered when the program has been executed for more than
MAX_STEP_COUNTsteps.
- This exit code will be triggered when the program has been executed for more than
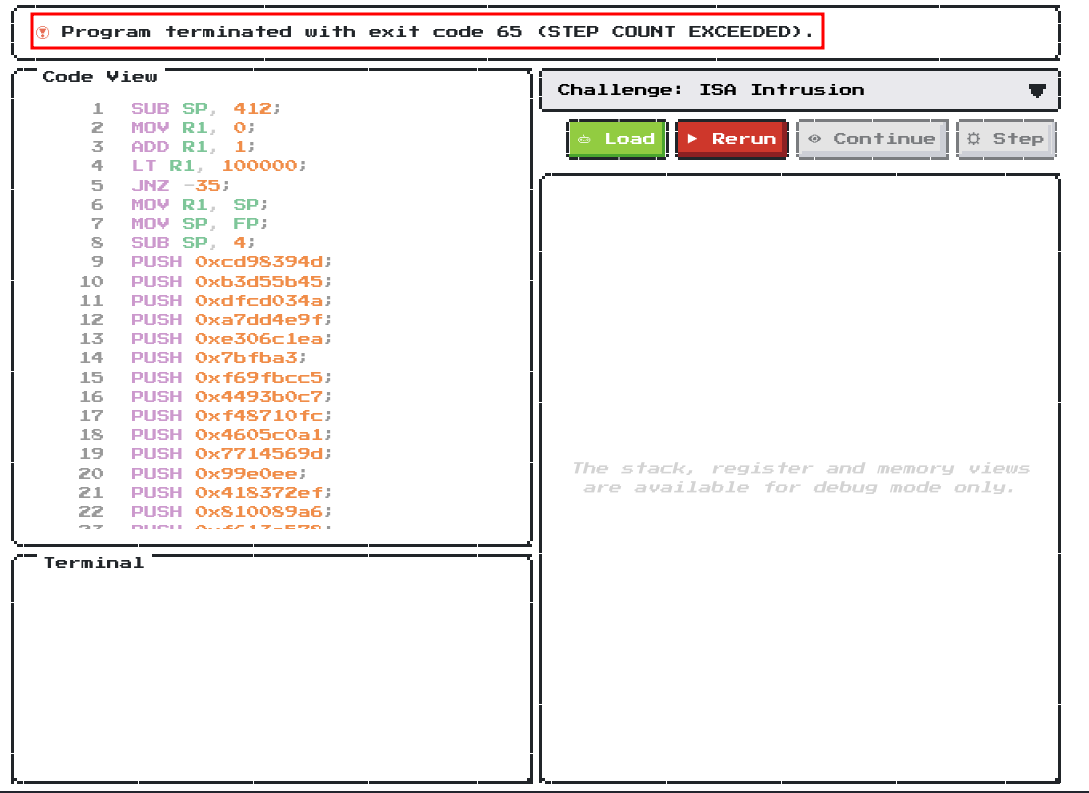
For example, the below program would yield an “step count exceeded” error because it did not terminate properly in MAX_STEP_COUNT steps (in reality, it would not terminate).
JMP 0x400000
Dynamic Reverse Engineering
Armed with the above information, we can finally tinker with the challenge's assembly code!
In the web application, we can choose the "Debug Playground" to debug the assembly code:

Let's copy the challenge's assembly code to there!
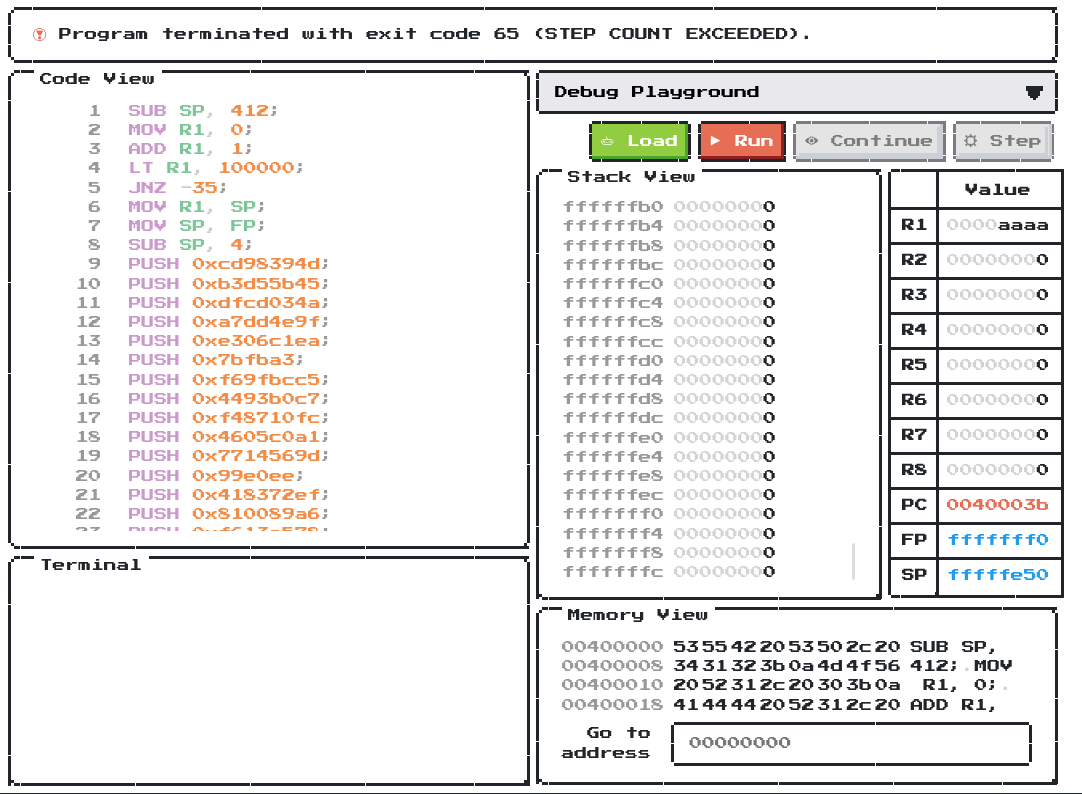
In the "Debug Playground", we can view the stack and memory. (it's like gdb but more user-friendly)
When we run it, it returned exit code 65 (STEP COUNT EXCEEDED).
To find out why this is happening, we can set a breakpoint at line 1 by clicking line 1:
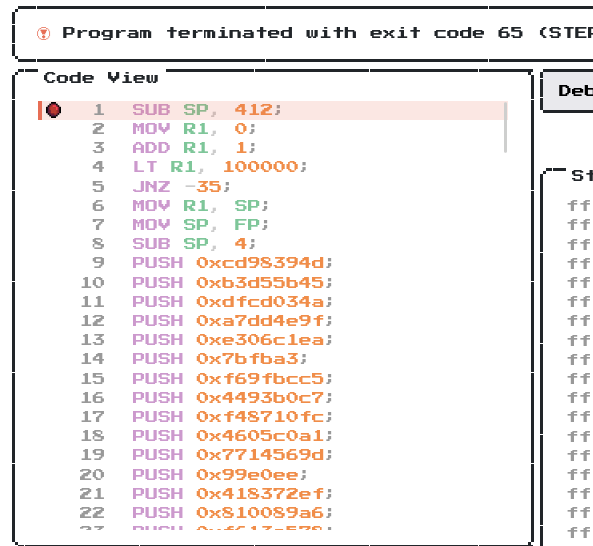
Then run it again:
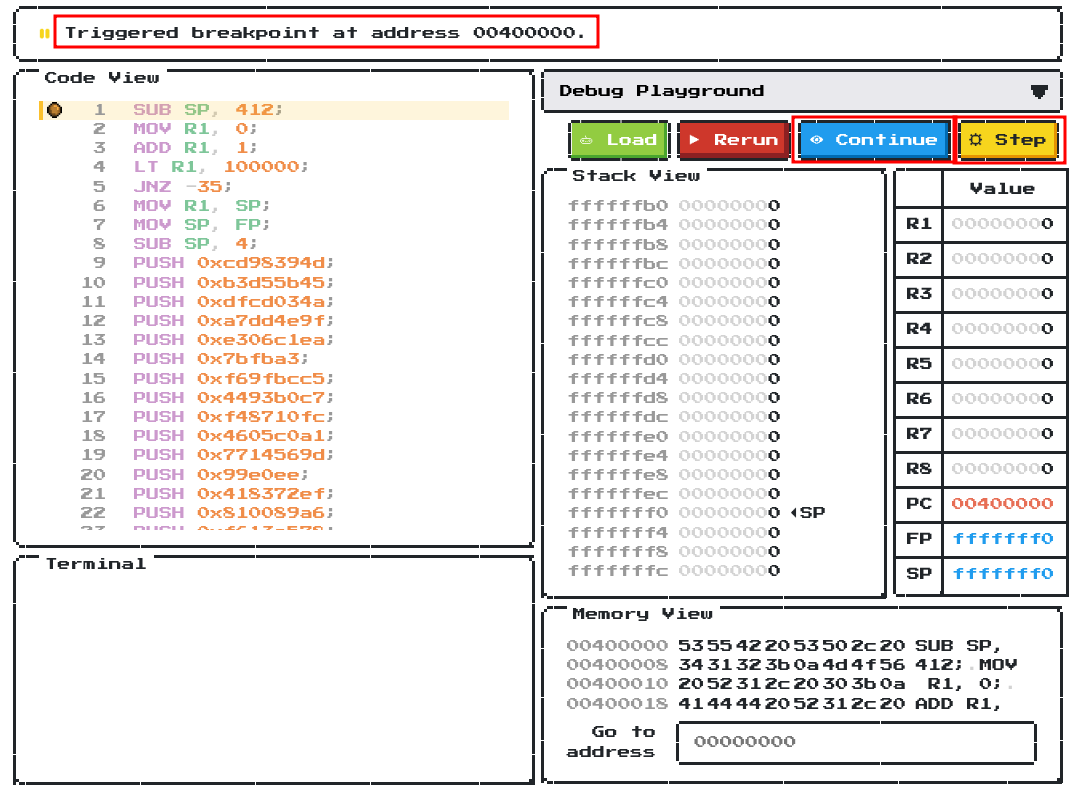
Now we triggered the breakpoint, we can either click the "Continue" button to run the code normally, or click the "Step" button to move 1 more step in the code.
Let's click "Step":
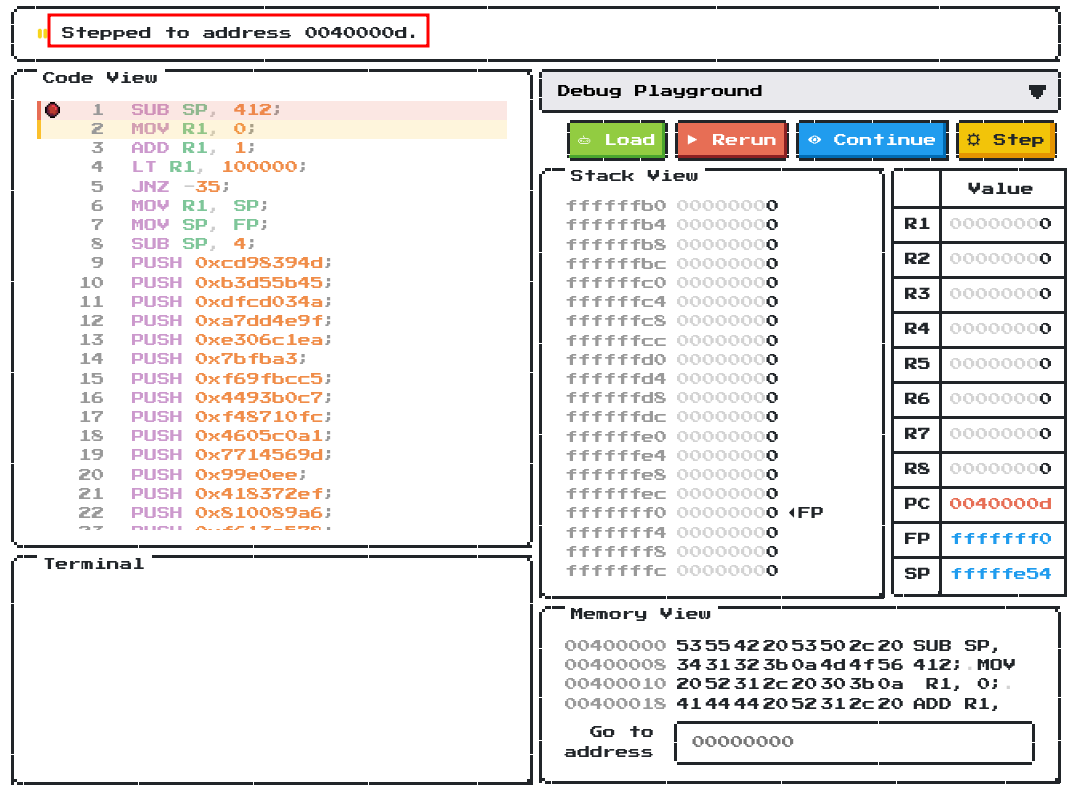
Now we're at line 2 (address 0x0040000d)!
Let's click "Continue" this time:
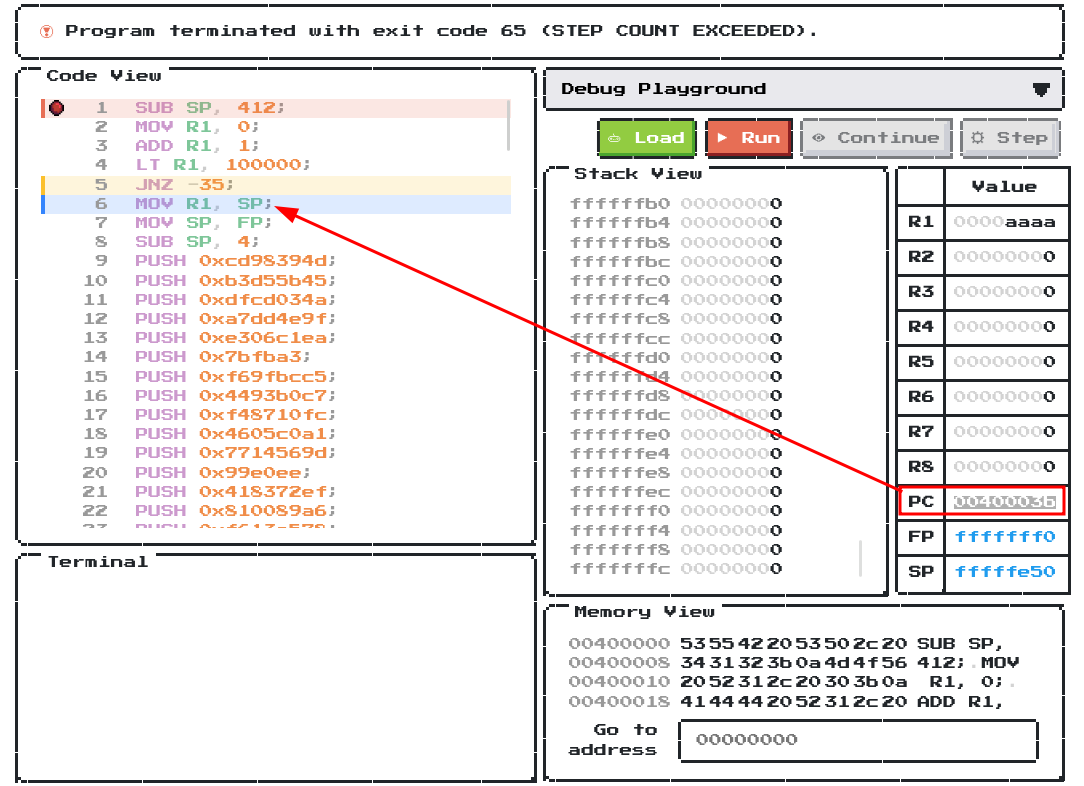
In here, we can see that **the PC's value is 0x0040003b, which is at line 6.
Therefore, the runner is stuck at line 5. Let's take a look at line 3 - 5!
ADD R1, 1;
LT R1, 100000;
JNZ -35;
As you can see, this is a simple loop structure, adding 1 to R1 each loop, and if R1 < 100000, it loops. As the runner can only run 131072 instruction, this makes this exceed the step count.
You can also convert the above loop to Python:
R1 = 0
while R1 < 100000:
    R1 += 1
In order to solve exit code 65 (STEP COUNT EXCEEDED) problem, we can perform an action for that, it's called "patching".
Patching is a method to editing the assembly code, so that we can run different things to make us understand the program more, bypass some restriction and so on. It's also a very useful technique for dynamic analysis in reverse engineering.
Let's patch LTmnemonic's argument2 to be 0 at line 4!
ADD R1, 1;
LT R1, 0;
JNZ -35;
By doing this, the assembly code will not enter the loop because of the condition.
You can think the above patching as the following Python code:
R1 = 0
while R1 < 0:
    R1 += 1
Now, run the patched assembly code again:
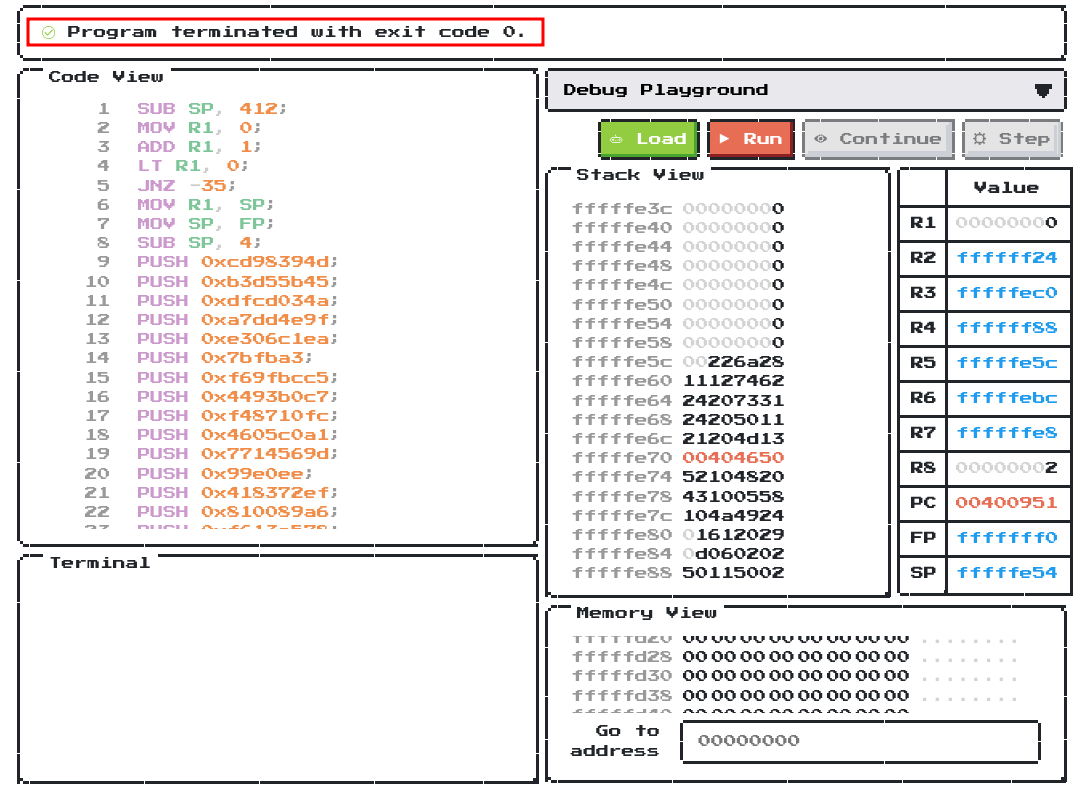
Nice! The runner returned exit code 0 (OK)!
But, where's the flag?? It doesn't get printed to the terminal on the left-corner box.
Hmm… Maybe it hid in the memory??
When we run the assembly code, the SP address is at 0xfffffe54.
Let's go there!
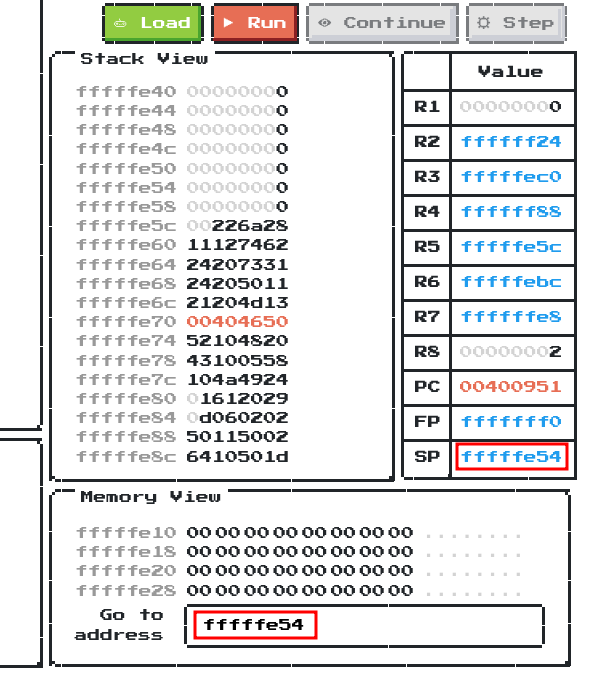

By scrolling down a little bit, the flag is indeed hid in the memory at address 0xffffff88!
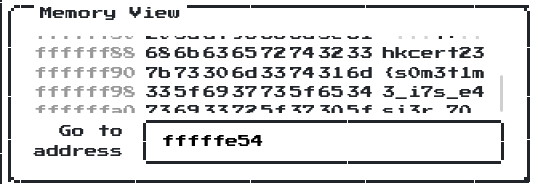
ffffff88 686b636572743233 hkcert23
ffffff90 7b73306d3374316d {s0m3t1m
ffffff98 335f6937735f6534 3_i7s_e4
ffffffa0 736933725f37305f si3r_70_
ffffffa8 64796e346d31635f dyn4m1c_
ffffffb0 7233765f6a753574 r3v_ju5t
ffffffb8 5f7034746368266c _p4tch&l
ffffffc0 306f6b5f34745f6d 0ok_4t_m
ffffffc8 336d6f72797d0000 3mory}
- Flag:
hkcert23{s0m3t1m3_i7s_e4si3r_70_dyn4m1c_r3v_ju5t_p4tch&l0ok_4t_m3mory}
Conclusion
What we've learned:
- Dynamic reverse engineering a custom assembly language